5.4 Setting up the credential profile
- From the Configuration category, select Credential Profiles.
- Select PIV Card from the list available in Select Profile.
- Click Modify.
-
Click Issuance Settings.
Note: PIV systems do not support additional identities. Make sure you do not select the Issue Additional Identities option.
For PIV cards, you must select the Require user data to be approved option – the option ensures that the cards can be issued only to users who have the User Data Approved flag set on their account.
This flag certifies that the applicant has been through the correct enrollment process and has been approved to receive a PIV card. The flag is set when you import an applicant using the Lifecycle API.
The maximum Lifetime of a PIV card is six years.
From the Pre-encode Card drop-down list, select one of the following:
-
None – the card is encoded during activation.
-
1-Step – the card is encoded during collection.
-
2-Step – the card is encoded using the Batch Encode Card workflow after collection.
Note: Both 1-Step and 2-Step pre-encode card options require activation – select an activation option from the Require Activation drop-down list.
-
-
Click PIN Settings.
Note: You can modify the PIN policies for PIV cards in the PIN Settings section only within certain limits. This means if you make changes to the following settings outside the accepted parameters, they are ignored:
-
Maximum PIN Length – the maximum length of PIN for a PIV card is 8.
-
Minimum PIN Length – the minimum length of PIN for a PIV card is 6.
-
Logon Attempts – you cannot set this option for PIV cards.
-
PIN Inactivity Timer – you cannot set this option for PIV cards.
-
PIN History – you cannot set this option for PIV cards.
-
-
Click PIN Characters.
The SP800-73 PIV specification requires that PIV cards use numeric-only PINs. It is possible to configure MyID to use non-numeric PIN characters for some PIV cards, although some devices will fail to issue.
For PIV cards, set number to be Mandatory, and uppercase letters, lowercase letters, and symbols to Not Allowed.
-
Click Device Profiles. From the drop-down list, select the Card Format you want to use.
The Card Format uses PIV data model files that determine the format of the content of the PIV cards; that is, which data goes in which field.
Choose one of the following card formats:
-
None – select this for non-PIV cards.
-
CBPivDataModel.xml – used for systems customized for Codebench only.
If you are using variant cards that do not support iris biometrics, select CBPivDataModelNoIris.xml instead.
-
CivCertificatesOnly.xml – used for CIV cards that do not require CHUID and applet customization.
-
CivCertificatesOnlyCompressed.xml – used for CIV cards that do not require CHUID and applet customization, using compressed data.
-
PivDataModel.xml – the standard PIV data model. Use for all standard PIV cards or for non US Federal sites who want to implement a PIV Interoperable (PIV-I) card.
If you are using variant cards that do not support iris biometrics, select PivDataModelNoIris.xml instead.
-
PivDataModelCompressed.xml – a data model that uses compressed data.
If you are using variant cards that do not support iris biometrics, select PivDataModelCompressedNoIris.xml instead.
-
-
Click Requisite User Data.
You can use this feature to ensure necessary data is present before cards are requested; for example, select Employee ID (which is displayed in MyID Desktop as the Security field) and PIV Distinguished Name to reduce potential errors during card issuance.
For more information see the Requisite User Data section in the Administration Guide.
- Click Next.
-
The Select Certificates stage is highlighted.
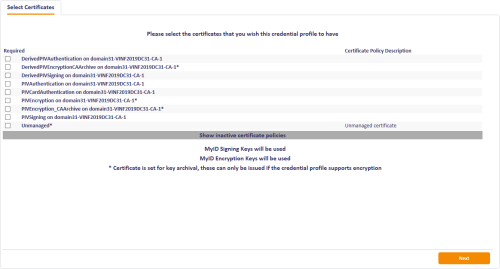
Select the required certificates and assign them to the correct containers.
You must select a PIV Authentication certificate and Card Authentication certificate for all smart cards. If the cardholder has a government-issued email account at the time of issuance, you must also select a Digital Signature certificate and a Key Management certificate.
If the card is to be used to log on to MyID, you must select Use for Signing for one certificate. You are advised to use the PIV Authentication Certificate for signing; you cannot use the Digital Signature Certificate.
Note: You can issue the PIV Authentication Certificate and PIV Card Authentication certificate only to credentials that contain a PIV applet. See the Smart Card Integration Guide for details of whether your credentials contain the PIV applet.
Click Next.
-
The Select Applets stage is highlighted.
Select the applets you want to copy onto the card. Click Next.
-
The Roles stage is highlighted.
-
In the Can Receive column, select the role you use for applicants.
-
In the Can Issue column, select the roles you want to be able to request cards using this profile.
-
In the Can Validate column, select the roles you want to be able to validate requests for this profile.
-
In the Can Collect column, select the roles you want to be able to collect requests for this profile.
Note: The options available on this screen are determined by the following configuration options on the Process page of the Security Settings workflow:
-
Constrain Credential Profile Issuer
-
Constrain Credential Profile Validator
-
Constrain Credential Profile Collector
-
Constrain Credential Profile Unlock Operator – not set by default.
See the Linking credential profiles to roles section in the Administration Guide for details.
-
-
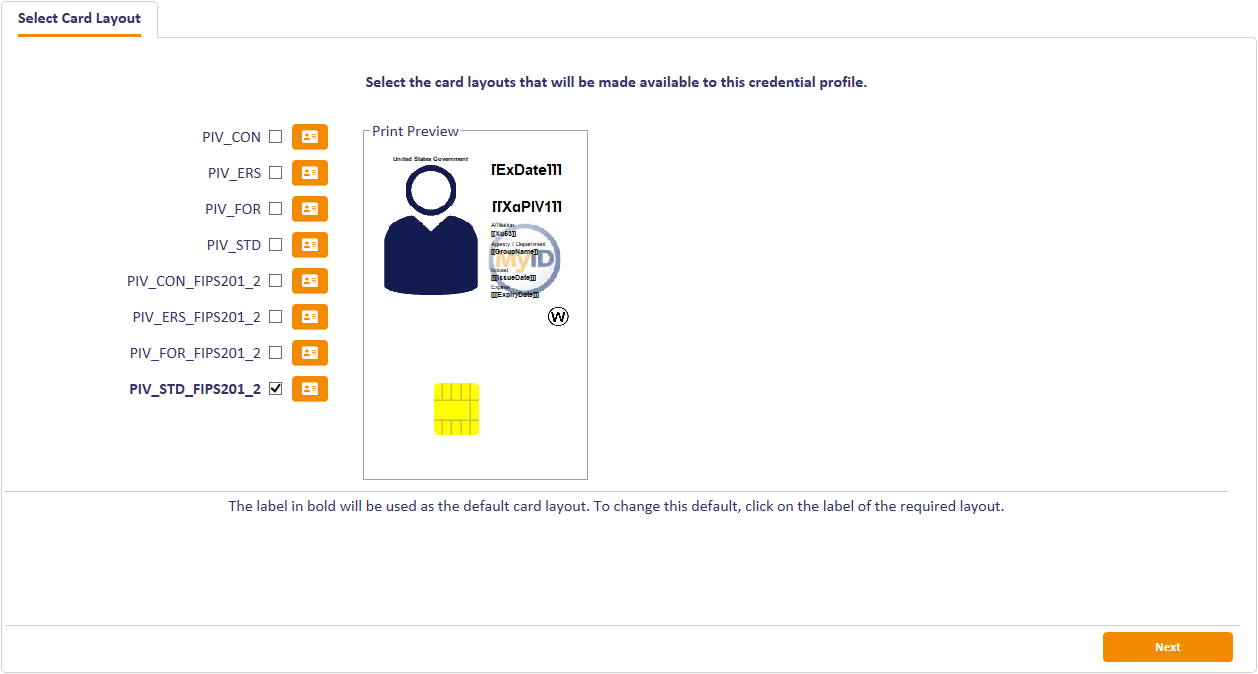
The Select Card Layout stage is highlighted.

Select the appropriate PIV card layout; for example, PIV_STD_FIPS201_2. You can either select multiple card layouts for a single credential profile, or create multiple credential profiles, each of which has a single card layout. You must ensure that you select the correct layout for the type of cardholder.
A selection of sample PIV card layouts are provided:
-
PIV_CON_FIPS201_2 – a FIPS 202-2-compliant layout for contractors.
-
PIV_ERS_FIPS201_2 – a FIPS 202-2-compliant layout for emergency response officials.
-
PIV_FOR_FIPS201_2 – a FIPS 202-2-compliant layout for foreign nationals.
-
PIV_STD_FIPS201_2 – a FIPS 202-2-compliant layout for standard PIV cards.
The following layouts are also available. These are the original layouts that were designed before FIPS 202-2.
-
PIV_CON – for contractors.
-
PIV_ERS – for emergency response officials.
-
PIV_FOR – for foreign nationals.
-
PIV_STD – standard PIV card layout.
You can select several card layouts to be available in the profile. If so, the issuer selects the layout when printing the card.
You can customize and create new layouts using the Card Layout Editor in the Configuration category. See the Designing card layouts section in the Administration Guide for details.
-
- Click Next to complete the workflow.

5.4.1 Updating existing card layouts
The card layouts provided with FIPS201_2 in their name comply with FIPS 201-3. If you have existing card layouts that you want to use, you must update them to use the correct format.
Note: Different manufacturers and models of card printer may print your layouts in different ways, and the layout of different names may cause issues on some printers. You are strongly recommended to test your card layouts, with a variety of names of different lengths, on the appropriate printer before printing production cards.
5.4.1.1 Updating from FIPS 201-1 to FIPS 201-2
To update your card layouts from FIPS 201-1 to FIPS 201-2:
- From the Configuration category, select Card Layout Editor.
-
For each card layout, edit the format of the name field:
- Open the layout you want to update.
-
Delete the Last Name and First Name and Initial elements from the card layout.
These are the elements used for zone 2a and 2b. These have been replaced by a single custom image that formats the full name in zone 2.
- On the toolbar, click Insert User Image.
- From the Image Source drop-down list, select fips201name.
- From the Template drop-down list, select PIV-Front.
- From the Zone drop-down list, select 2: Name.
- Save the card layout.
-
For each back layout (with a name ending in _back), edit the format of the serial number field and adjust the location of the issuer ID:
- Open the layout you want to update:
- Delete the Card Serial Number element from the card layout.
- On the toolbar, click Insert User Image.
- From the Image Source drop-down list, select SerialNoFormatter.
- From the Template drop-down list, select PIV Back.
- From the Zone drop-down list, select 1: Card number.
- Select the IssuerID element.
- From the Zone drop-down list, select None.
- From the Zone drop-down list, select 2: Issuer ID.
- Save the card layout.
-
For the Emergency Response Official layout (based on PIV_ERS), change "Emergency Response Official" to "Federal Emergency Response Official":
- Open the emergency response official layout.
- Select the bar at the bottom of the screen with the text Emergency Response Official.
- Edit the text in the Content box to read Federal Emergency Response Official.
- Save the card layout.
-
For the standard layout (based on PIV_STD), add a white stripe with a circled W as the name background:
- Open the standard layout.
- Click the Insert Picture button.
- From the list, double-click the White.jpg image.
- From the Template drop-down list, select PIV-Front.
- From the Zone drop-down list, select 15: Name background.
- Right-click the image, then from the pop-up menu select Send to back.
- Save the card layout.
5.4.1.2 Updating from FIPS 201-2 to FIPS 201-3
To update your card layouts from FIPS 201-2 to FIPS 201-3:
- From the Configuration category, select Card Layout Editor.
-
For each card layout, edit the format of the name field:
- Open the layout you want to update.
-
Delete the 2D Barcode element from the card layout.
This is the element used for zone 6.
- Save the card layout.
-
For each back layout:
- Open the layout you want to update:
-
Delete the Linear Barcode element from the card layout.
This is the element used for zone 8.
- Save the card layout.
Note: It is very important that you confirm that any customized layouts you produce are fully compliant with the FIPS 201-3 standards. See your NIST FIPS 201-3 documentation for details.
5.4.2 FASC-N values
There are two methods of providing FASC-N information: FASC-N (ASCII) and FASC-N (Hex). These values are available when you edit the attributes in the Certificate Authorities workflow.
The majority of certificate authorities use the Hex version. The ASCII version is currently used in EJBCA and Symantec CAs to provide a printable version of the FASC-N.
Note: Make sure that you use the correct version for your policy and certificate authority: if you use the wrong version, the certificate fails to issue.